Sunday, February 23, 2014

All American Meatloaf

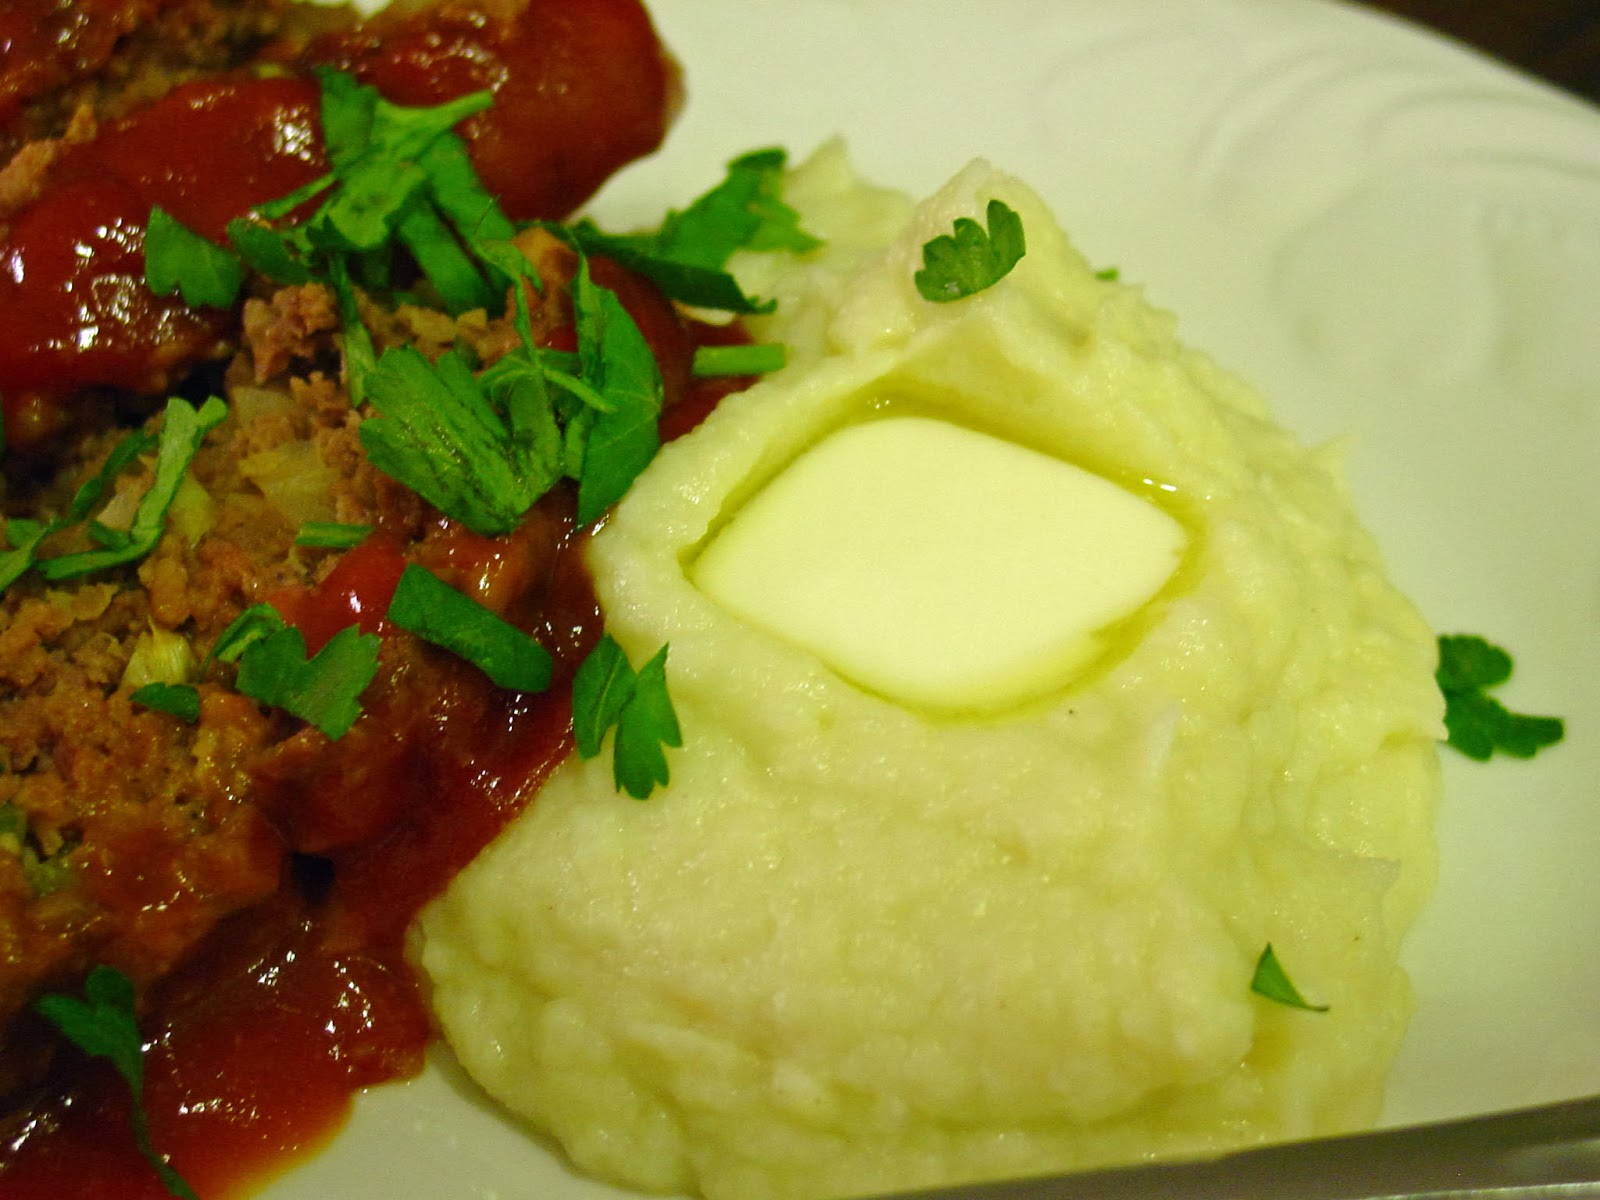
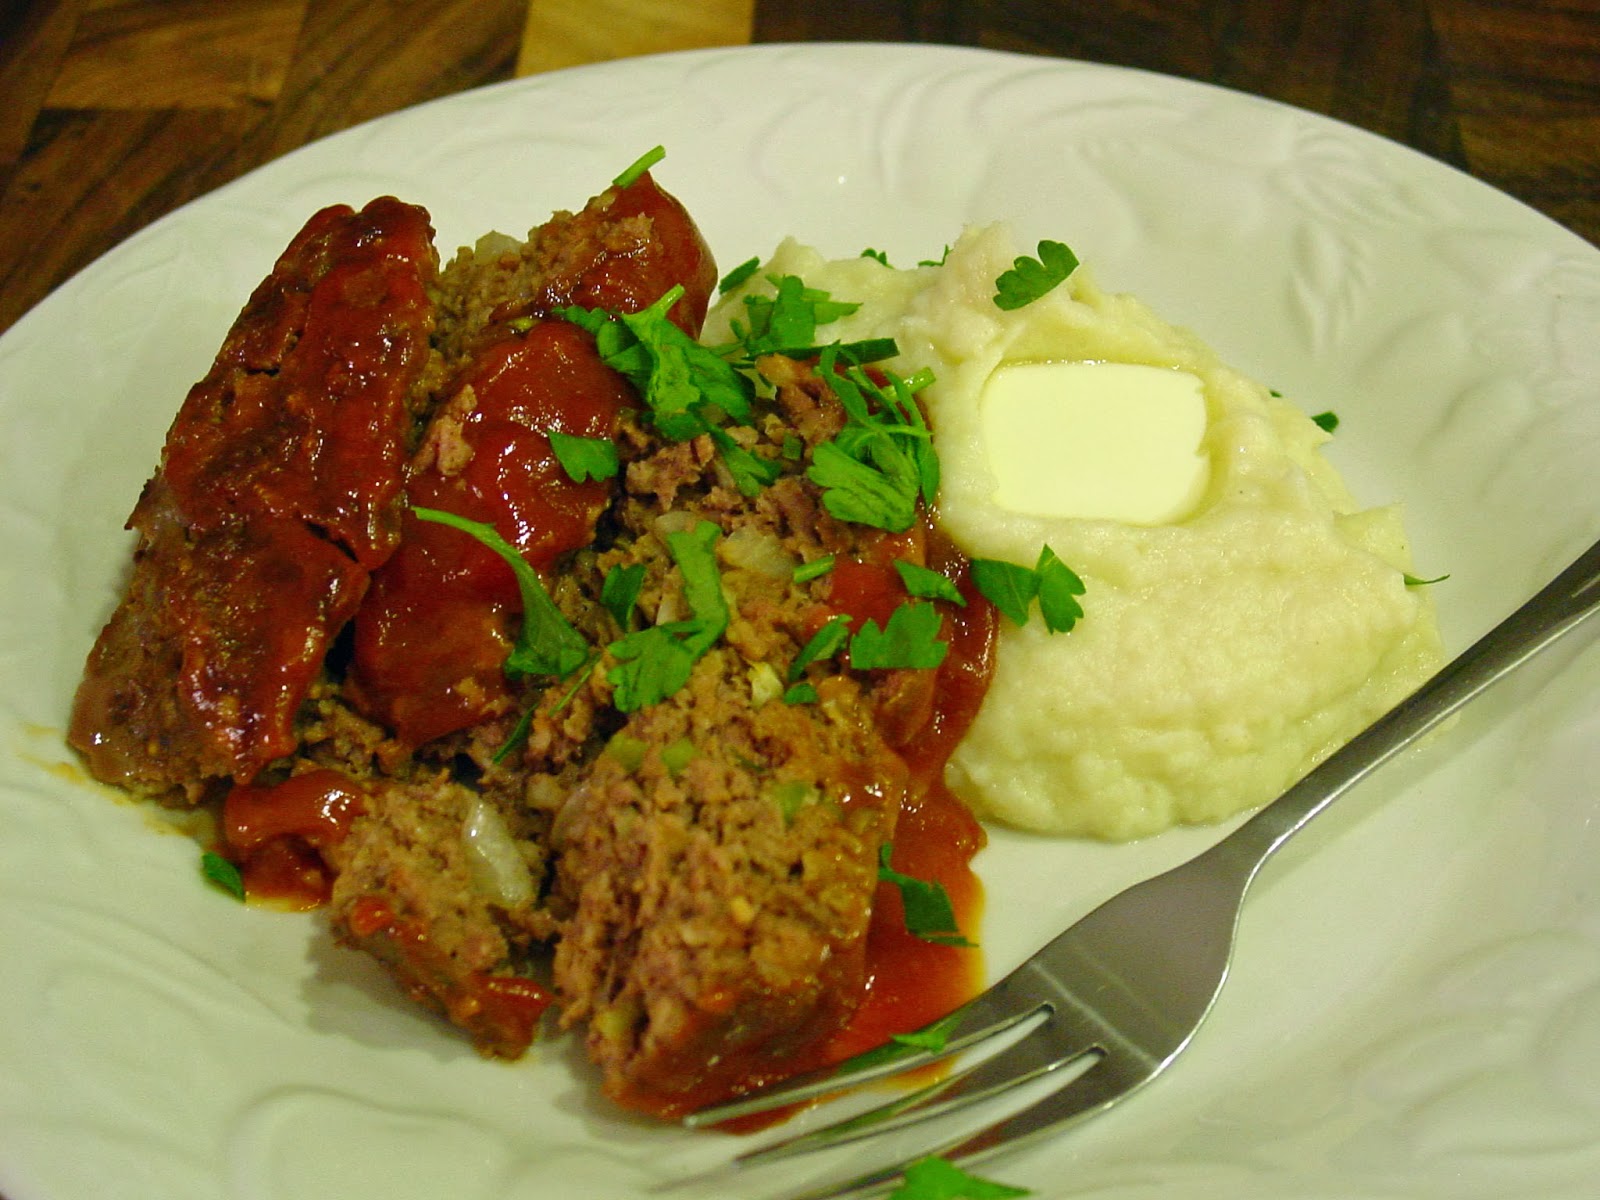
This recipe is what I call Today's Food in our Family Cookbook. Mom was given this recipe by a friend when I was grown and sharing a house with dear sister. It quickly became a go to recipe for me. The original recipe called for ground chuck and whole milk. I always use lean beef and low fat milk. It is still deliciously moist without all the fat. Today I experimented a little. I made half the recipe and added a few tablespoons of finely diced green bell pepper. It worked well as an individual meatloaf, but I don't think the peppers added much. The recipe is great as is. I have been serving it with Microwave Garlic Mashed Cauliflower and sometimes green beans. Such a delicious meal, pure comfort food.


All American Meatloaf
Serves 6 to 8

Ingredients

2 lbs lean ground beef (93% lean)
3/4 cup uncooked quick cooking oats
1 small/medium onion, finely chopped
1/2 cup ketchup
1/4 cup 2% milk
2 large eggs, lightly beaten
1 teaspoon salt
1/2 teaspoon pepper

Topping:
1/2 cup ketchup
2 tsp. prepared mustard
1-1/2 Tbsp. brown sugar

Directions

Preheat oven to 350 degrees.

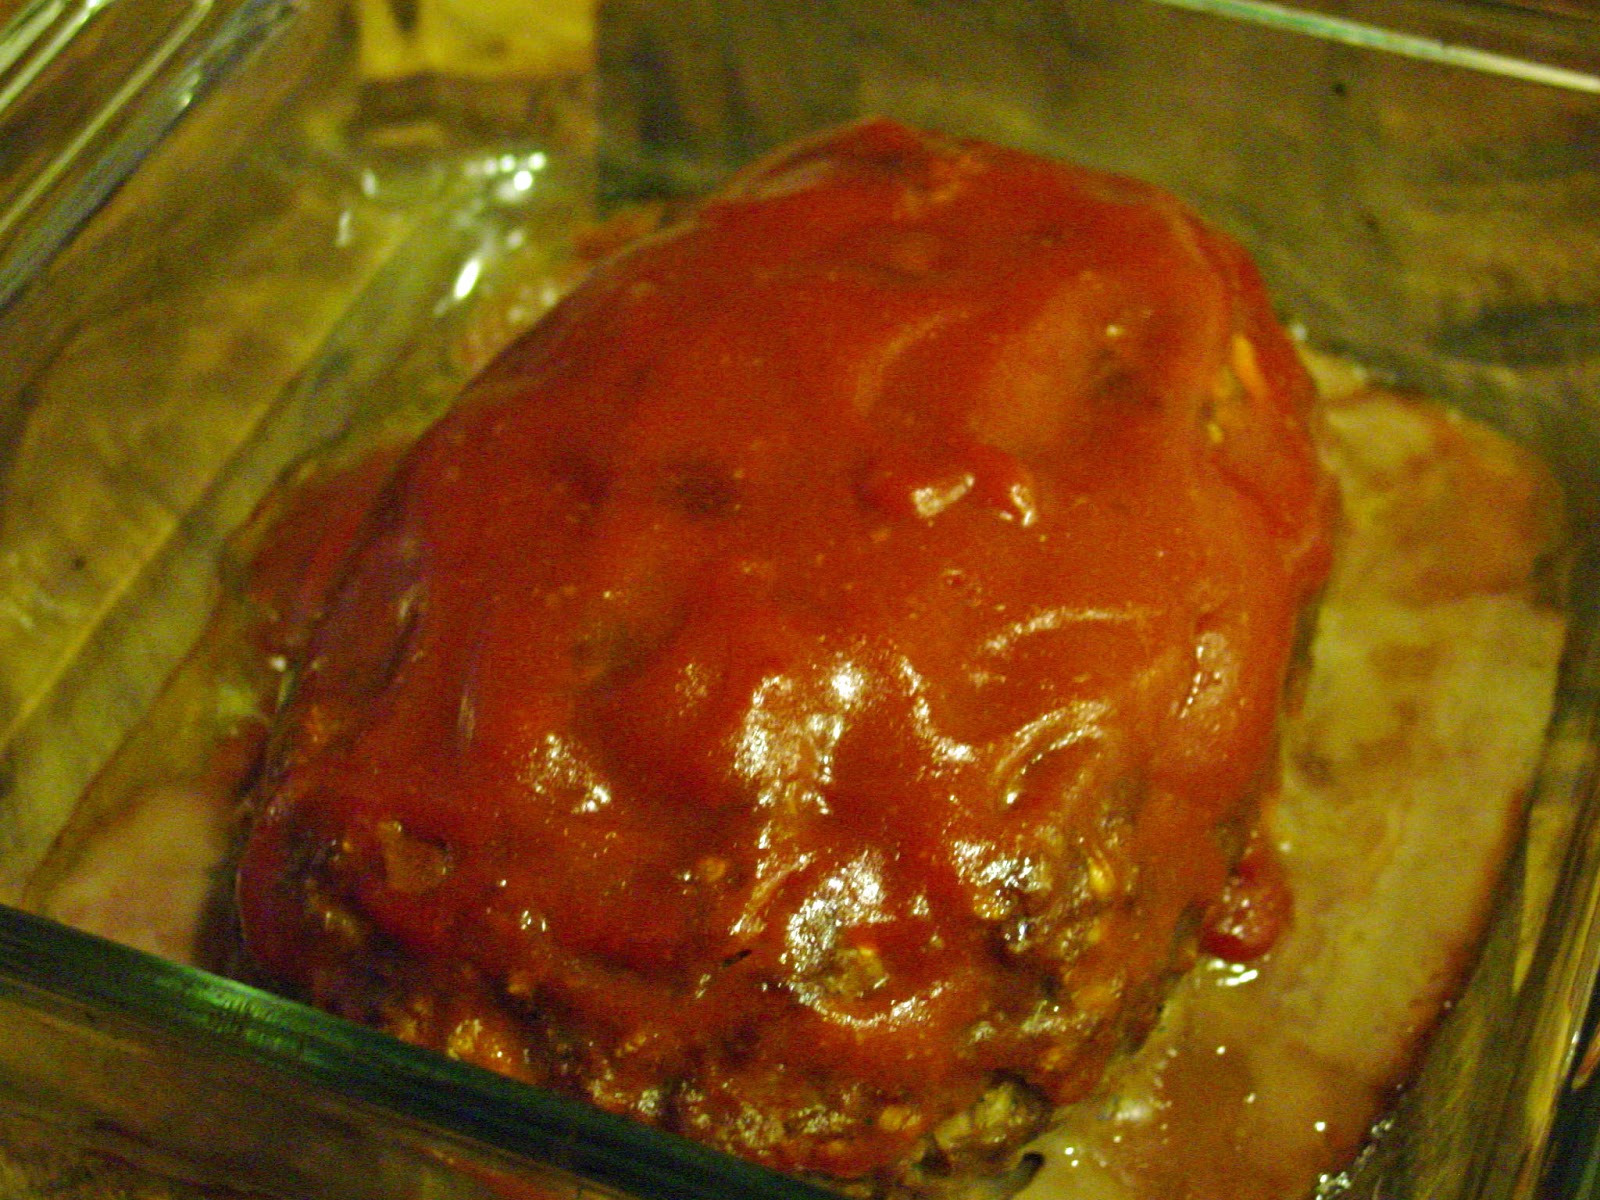
Combine meat, oatmeal, onion, egg, 1/2 cup ketchup, milk, salt and pepper in large bowl; shape into 2 loaves in 9” x 9” pan. Bake at 350 for 40 minutes. Combine topping ingredients and spoon over meat loaf, bake 15 more minutes. Let stand a few minutes before slicing.

Note: Oven temperatures vary, so cut meatloaf in half to check for doneness. If necessary place back in the oven and cook until done.


Linking to:
Ms. enPlace: See Ya in the Gumbo
This Gal Cooks: Marvelous Mondays Link Party
The Chicken Chick: Clever Chicks Blog Hop
Jam Hands: Recipe Sharing Monday
The Tumbleweed Contessa: What'd You Do This Weekend
Buns In My Oven: What's Cookin' Wednesday
Miz Helen's Country Cottage: Full Plate Thursday
My Turn for Us: Freedom Friday with All My Bloggy Friends

Microwave Garlic Mashed Cauliflower

I have been making "Mock" Garlic Mashed Potatoes by George Stella for years. His recipe is not potato at all, it is really mashed cauliflower with big garlic flavor. Recently I decided I wanted to make it simple and use one dish. So this recipe was born. Why not cook the cauliflower in the microwave and in the dish I plan to serve it in? I LOVE only one dish to clean up. It worked perfectly. I think it retains more of the cauliflower flavor too. If you are trying mashed cauliflower as an alternative to potatoes you may want to boil the cauliflower instead. I love cauliflower so more flavor is more delicious! This Microwave Garlic Mashed Cauliflower is a great side for the All American Meatloaf.


Microwave Garlic Mashed Cauliflower
Serves 4

Ingredients

1 medium head cauliflower
1 Tbsp. 1/3 less fat cream cheese, softened
1/4 cup grated Parmesan
1 small clove garlic (1/2 tsp.), grated
1/8 tsp. chicken bouillon
1/8 tsp. white pepper
3 Tbsp. unsalted butter
Kosher salt to taste

Directions

Clean and cut cauliflower into small pieces. Place cauliflower in a 1-1/2 or 2 quart microwave safe casserole. Sprinkle with a little water, cover and microwave for 14 minutes. Let stand 5 minutes covered. Add cream cheese, Parmesan, garlic, chicken base, and pepper. Blend with an immersion blender, or in a food processor, puree the hot cauliflower until almost smooth. Taste for seasoning, add salt if necessary. Serve hot with pats of butter. 


Linking to:
This Gal Cooks: Marvelous Mondays Link Party
My Plate of Crumbs: Random Recipe Roundup
The Plaid and Paisley Kitchen: Show Me Your Plaid Monday's
Anyonita Nibbles: Tasty Tuesdays
It's Your Life: Tuesdays with a Twist
Turnips 2 Tangerines: Four Seasons Blog Hop

Saturday, February 22, 2014

Rotisserie Chicken Soup

This soup was inspired by a soup dear sister brought home from Carrabba's. I only had a bite or two of Mama Mandola’s Sicilian Chicken Soup and I knew I wanted to re-create it. It almost tasted like it started with a roux and it had a slow roasted chicken flavor in my humble opinion. When I looked for a copycat recipe none of the recipes sounded like the soup I had tried. So I went it alone and tried to develop my own recipe. I knew I wanted to use a roasted chicken. I thought about roasting my own and making a bone stock (maybe next time), but I decided to take a short cut. I bought a rotisserie chicken and chicken stock. This makes the soup so fast and easy to prepare. Got to love that! I decided to use a little flour to thicken the soup. I was going for the roux flavor I tasted in Carrabba's soup. All in all, I think it was a great success! It is loaded with carrots, onions and celery like many chicken soup recipes. But this one has a rich brown or roasted flavor. I used Herbs de Provence and parsley to season it as well. It is so yummy! I did have to use elbow pasta instead of ditalini like in my inspiration soup. I could not find the ditalini at my store, maybe next time I make this soup. There will definitely be a next time real soon. This maybe my new favorite chicken soup.


Rotisserie Chicken Soup
Serves 6 to 8

Ingredients

2 Tbsp. olive oil
1 medium onion, chopped
3 small carrots, cut into 1/2 inch slices or cubes
3 celery ribs, cut into 1/2 inch slices or cubes
1/2 green bell pepper, cut into 1/2 inch dice
3 garlic cloves, minced
2 Tbsp. flour
2 Tbsp. tomato paste
1 tsp. Herbs de Provence (without lavender)
1 bay leaf
2 quarts chicken stock
1 cup dried small elbow macaroni
2 cups shredded chicken from a rotisserie chicken
3/4 tsp. kosher salt, or to taste
1/4 tsp. freshly ground black pepper, or to taste
1/8 tsp. red pepper flakes, or to taste
1 handful parsley, finely chopped

Directions

Place a large pot of water to boil.

Place another soup pot over medium heat and add olive oil. Add the onion, carrots, celery and bell pepper. Cook and stir for about 6 minutes, until the vegetables are softened but not browned. Stir in garlic, tomato paste and flour. Continue to stir and cook until the flour and tomato paste brown a little. Add Herbs de Provence, bay leaf and chicken stock; bring the liquid to a boil. Fold in the chicken, and season with salt, black and red pepper. Continue to simmer on low for 18 minutes while you cook the pasta.

Add elbow macaroni to the boiling water and cook according to package directions. Drain pasta and add to the soup pot. Add chopped parsley and taste for seasoning. Adjust seasoning if necessary. Remove from heat and serve.


Linking to:
Love Bakes Good Cakes: The Ultimate Soup Recipe List Linky
Ms. enPlace: See Ya in the Gumbo
This Gal Cooks: Marvelous Mondays Link Party
The Chicken Chick: Clever Chicks Blog Hop
My Plate of Crumbs: Random Recipe Roundup
The Plaid and Paisley Kitchen: Show Me Your Plaid Monday's
Jam Hands: Recipe Sharing Monday
The Tumbleweed Contessa: What'd You Do This Weekend
Anyonita Nibbles: Tasty Tuesdays
It's Your Life: Tuesdays with a Twist
Dizzy Busy & Hungry: Wine'd Down Wednesday
Buns In My Oven: What's Cookin' Wednesday
Turnips 2 Tangerines: Four Seasons Blog Hop
Miz Helen's Country Cottage: Full Plate Thursday
My Turn for Us: Freedom Friday with All My Bloggy Friends
My Pinterventures: Souper Bowl 2015 Party


Wednesday, February 19, 2014

Cheese Tortellini Soup with Gremolata

I saw this on Food Network years ago. It has been awhile but I think it was on one of Rachael Ray's shows? It is great when you are sick. My favorite when I have a cold. It is so easy to prepare. I have even been without a lemon and substituted lemon pepper and lemon juice. Still very tasty. Luckily I am not sick today. I just wanted this delicious soup. This makes a very thoughtful and sweet gift for a sick friend. Whether in the grocery bags from the store or arranged in a basket. They will appreciate the recipe and ingredients. I LOVE the gremolata! The parsley, lemon and garlic is fresh and flavorful. We have heard that chicken soup heals and Vitamin C is important to prevent colds. This soup has it all; it is fast, easy and delicious. Commit it to memory you never know when you are going to need it.


Cheese Tortellini Soup with Gremolata
Serves: 8

Ingredients

8 cups fat free low sodium chicken broth
Freshly ground black pepper
1 (20 oz.) package refrigerated three cheese tortellini
Handful of fresh Italian parsley leaves, chopped
Zest of one lemon, minced
1 garlic clove, minced

Directions

Pour the broth into a heavy large saucepan. Cover and bring to a boil over high heat. Season the broth with pepper, to taste. Add the tortellini. Simmer over medium heat until al dente, about 7 minutes.

Prepare the gremolata. Mince parsley, lemon zest and garlic together. Add to broth, stir to combine and take off of heat. Ladle the broth and tortellini into soup bowls and serve.


Linking to:
Love Bakes Good Cakes: The Ultimate Soup Recipe List Linky
Ms. enPlace: See Ya in the Gumbo
The Chicken Chick: Clever Chicks Blog Hop
My Plate of Crumbs: Random Recipe Roundup
The Plaid and Paisley Kitchen: Show Me Your Plaid Monday's
Jam Hands: Recipe Sharing Monday
The Tumbleweed Contessa: What'd You Do This Weekend
Anyonita Nibbles: Tasty Tuesdays
It's Your Life: Tuesdays with a Twist
Buns In My Oven: What's Cookin' Wednesday
Turnips 2 Tangerines: Four Seasons Blog Hop
Miz Helen's Country Cottage: Full Plate Thursday
Carole's Chatter: Food on Friday - Quick & Easy
My Turn for Us: Freedom Friday with All My Bloggy Friends
Kahakai Kitchen: Souper Sundays

Sunday, February 16, 2014

Creamy Broccoli Soup

Wow! I thought I was getting better at the photography thing. And then this happens. Here are some really weird pictures of another creamy vegetable soup with no cream. I am always looking for veggie soups for lunch, a snack or as a starter. I usually want them low cal so I don't have to worry about having another serving. I have been wanting to make Broccoli and Cheese Soup, so I decided to make a Creamy Broccoli Soup and garnish with light cheddar cheese and light sour cream. This soup was so good! You don't even need the garnishes. In fact, I liked it better without. The shallot and carrot add a lot of sweetness. This soup is a great way to spoon up your broccoli. I used frozen broccoli but fresh would work well too. Another great go to veggie soup.


Creamy Broccoli Soup
Serves 4 to 6; Makes approx. 6 cups

Ingredients

2 Tbsp. unsalted butter
1 shallot, finely diced
1 carrot, peeled and finely diced
1 rib of celery, finely diced
1 small clove of garlic, minced
16 oz. bag of frozen broccoli florets
4 cups fat free low sodium chicken broth
Kosher salt, black pepper and red pepper flakes to taste
2% sharp cheddar cheese (optional)
light sour cream (optional)

Directions

Melt butter in a soup pot, add shallot, carrot and celery. Saute until shallot begins to get translucent. Add garlic and cook until vegetables are tender. Add broccoli and chicken broth and bring to a boil. Lower the heat to a simmer for 20 minutes. Use a stick blender to partially puree the soup. Season to taste with salt, black pepper and red pepper flakes. Serve hot. Garnish with cheddar cheese and sour cream (optional).


Linking to:
Love Bakes Good Cakes: The Ultimate Soup Recipe List Linky
Ms. enPlace: See Ya in the Gumbo
The Tumbleweed Contessa: What'd You Do This Weekend?

Saturday, February 15, 2014

Asian Inspired Breakfast Bowl

I guess I am in a savory breakfast phase. First there was Breakfast Pizza and now an Asian Inspired Breakfast Bowl. This is not authentic at all! This is my experiment to see if I want to try a more authentic recipe for Congee. I have seen Congee on at least two different cooking shows lately. It is a long cooking rice porridge that they eat in China for breakfast. I decided to make a quick microwave version with left over rice. I really loved it. My version is more soup like. I really like the richness of the broken yolk in the broth. I love the spice of the Sriracha too. I will definitely try a authentic Congee recipe one day. In the mean time, I look forward to days when I have left over rice.


Asian Inspired Breakfast Bowl
Serves 1

Ingredients

3/4 cup leftover white rice
1 tsp chicken bouillon
1/2 tsp ginger, grated
1 cup water
1 egg
1 tsp canola oil
drop or two of sesame oil
low sodium soy sauce, to taste
Sriracha sauce, to taste
1 green onion, sliced

Directions

Combine rice, bouillon, ginger and water in a 2 cup microwave safe bowl. Microwave for 4 minutes stirring half way through. Meanwhile heat canola and sesame oil in a non-stick pan. Add egg and cook over easy or until white is set. To serve, place egg on top of rice and broth mixture. Garnish with soy sauce, Sriracha and green onion.


Linking to:
Ms. enPlace: See Ya in the Gumbo
The Tumbleweed Contessa: What'd You Do This Weekend?
Carole's Chatter: Food on Fridays - Leftovers

Thursday, February 13, 2014

Traditional Hummus

Recently I learned that there are techniques for making really smooth hummus. I stumbled upon a My Fitness Pal message board where people were almost raging against grainy hummus. I thought really? Isn't this being a little picky? I mean a little grainy textured hummus is better than no hummus at all? Then people started offering suggestions. This is where it got interesting. Some swear you had to start with dry garbanzo beans and cook them until very soft. Others said you have to peel the canned garbanzo beans. Then one or two others said you had to cook canned garbanzo beans in water until very soft. Well I have to admit I really was not interested in all that work. I like my hummus now? But then my dear sister commented on the last batch of hummus I made. She said you got it smooth like I like it. What? I did not know that is what she was looking for in hummus. I guess everyone but me cares about the smoothness of hummus. So let the experimenting begin.

I decided to try to peel the garbanzo beans and share my basic hummus recipe with you. The recipe is one I copied from the WW recipe review board. The poster said it was the traditional way to make hummus. It is the recipe I use as a base for all my flavored hummus recipes. I think adding the reserved liquid from the can helps make the hummus smooth too. I always garnish the way one of the Greek restaurants here presents it. Drizzled with olive oil and sprinkled with spices. So pretty! As far as the experiment goes, it actually works. Now this is the first of the methods I tried. I really don't know if I am qualified to say it is perfectly smooth hummus, since I did not have a problem with my hummus recipe before. But I can tell you it is really smooth, there is a definite difference. Dear sister thought it was great, so consider it one smooth hummus fan approved. I will try cooking the canned beans next. So stay tuned for more experiments and another hummus recipe.


Traditional Hummus
Makes about 1-3/4 cups

Ingredients

1 can garbanzo beans (drained, reserving liquid)(peeled optional)
3 Tbsp tahini
juice of 1 lemon (3 Tbsp)
2 cloves garlic, minced
3/4 to 1 tsp kosher salt, or to taste*

Directions

Add can of garbanzo beans, 1/3 cup of the liquid from the can, tahini, lemon juice, garlic and salt to the food processor. Blend until smooth. Add more liquid depending on how thick you like it. 

To serve: I spread 2 Tbsp on a plate. Make a moat in the hummus with the back of a spoon. Drizzle moat with olive oil. Sprinkle with paprika and chili powder. In the very center place a black olive (kalamata is best) and finely chopped pickled jalapeno. It looks like something from my favorite Greek restaurant. Serve with pita or veggies for dipping.

*Note: About salt, I usually eat hummus with vegetables and I find that you have to season the hummus with a little more salt. If you use it as a sandwich spread you should reduce the salt because deli meat is well seasoned. Be sure to adjust the salt to your taste or for your purpose.


Linking to:

Friday, February 7, 2014

Tomato Basil and Brie Pasta

I discovered this recipe in Redbook magazine while at the hair salon back in August. The article was about 3 no cook pasta sauces. I have already made one of the recipes, Quickie Pad Thai. This is the second recipe from the article. It was delicious and another fast weeknight meal. I knew tomato and basil was delicious together but I had no idea that the brie would be so good with tomatoes. I love how the brie melts into a sauce. The original recipe uses heirloom tomatoes. I used cherry tomatoes because the heirloom variety can be hard to find here. I used the "Phil Bry" method Rachael Ray talks about to half them. I placed the tomatoes between two deli lids and sliced along the equator between the two lids. Such a great time saver. Dear sister loved this dish. She said she thought she could make this one. This recipe is a win, win, delicious and I might have found someone to cook it next time. LOL!


Tomato Basil and Brie Pasta
Adapted from: Redbook August 2013
Serves 4 to 6

Ingredients

12 oz. medium shell pasta
1 pint yellow cherry tomatoes, halved
1 pint red cherry tomatoes, halved
1/4 cup olive oil
1/4 cup torn basil leaves
8 oz. brie cheese, rind removed and cut into small pieces
Kosher salt, black pepper and red pepper flakes to taste

Directions

Prepare pasta according to package directions. Reserve 1/2 cup cooking liquid.

Toss tomatoes, olive oil, basil and brie in a large bow; season with salt, black and red pepper. Let stand 5 to 10 minutes as the pasta cooks for the tomatoes to release their juices.

Drain pasta and toss with tomato mixture, adding cooking liquid 1/4 cup at a time to create a sauce.


Linking to:
My Turn for Us: Freedom Fridays with All My Bloggy Friends
My Kitchen Escapades: Super Saturday Link Party
My Mixing Spoon: Random Recipe Roundup
Ms.enPlace: See Ya in the Gumbo
Carole's Chatter: Food on Friday - Quick & Easy

Thursday, February 6, 2014

Recipe Review: Black Bean Stoup

For the past three maybe even four years, I have been participating in a Christmas card recipe exchange. A very special woman organizes it. She receives emails from all of us and arranges the participants into groups. You send ten Christmas cards with your favorite recipes to relative strangers and you receive ten Christmas cards with recipes in return. It is so much fun to see where the card came from and what the giver likes to cook. This year I received a recipe for Black Bean Stoup. It is the first recipe I decided to cook from the exchange. It turns out it is a Rachael Ray recipe [Click here for the original recipe]. The only difference between the recipes is that the giver added lime juice, so I squeezed the juice of a small lime in at the end of cooking. Both recipes called for 2 or 3 tablespoons of hot sauce. I used 3 tablespoons of Cholula hot sauce. I LOVE that stuff! It adds a smokey spice that you just can't get from just any hot sauce. It was so good! I will definitely make this recipe again. I loved everything about it. The veggies are a little tender crisp and the beans soft. The flavor was amazing too. The cumin and hot sauce added a lot of smokey goodness. This was a great recipe and I am so happy to have received it this year.


See the card below? It is a Scentsy card! 
I did not know these existed until this year. The thoughtful person who sent the recipe tucked it into a wonderful great smelling Scentsy card. You open the envelope and the warm spicy scent of Christmas wafted out. There is a little scent disc in the card. It still smells like Christmas right now. 
I think I might need to send these cards next Christmas.


Breakfast Pizza

If you love thin crust pizza and over easy eggs you are going to love this breakfast. This is the brain child of my favorite person in the world. He started making pizza at home using store bought ultra thin pizza crust or flour tortillas. He told me he made one with precooked breakfast sausage and egg. I had flour tortillas and tried it myself. It was delicious! He is such a smart guy! Since then, I have made all kinds of individual pizzas. It is so easy and there is almost nothing to clean up. This morning I made a Breakfast Pizza with bacon and egg. It was so good! The tortilla gets really crispy on the edges and the egg perfectly over easy. Definitely a great new breakfast or breakfast for dinner option.


Breakfast Pizza
Serves 1 or 2

Ingredients

2 - 6" flour tortilla
2 Tbsp. pizza sauce
Mozzarella cheese
1 slice precooked bacon, chopped
2 large eggs

Directions

Preheat oven to 450 degrees.

Place tortillas on a piece of aluminum foil. Spread a tablespoon of pizza sauce on each. Top with half of the cheese and bacon; arranging the bacon around the edge. Carefully break an egg in the center of each tortilla. Place the pizzas on the aluminum foil in the center of the oven and bake for 8 minutes. Remove from the foil and enjoy!


**UPDATE**
For an even crisper crust place a sheet pan
upside down in the oven before you pre-heat the oven.
Place your tortilla and foil on the sheet pan.
The tortilla will be evenly crisp from center to edge.

Linking to:
My Turn for Us: Freedom Fridays with All My Bloggy Friends
My Kitchen Escapades: Super Saturday Link Party
My Mixing Spoon: Random Recipe Roundup
Ms.enPlace: See Ya in the Gumbo
Carole's Chatter: Food on Friday - Pizza

Tuesday, February 4, 2014

White Balsamic Vinaigrette

Or as sister and I named it today Sweet Sister’s Vinaigrette. For lunch today dear sister came over and made lunch while I worked from home. She made gnocchi with a carbonara sauce both from World Market. She also had spinach and mushrooms for a salad. She asked me to walk her through making a vinaigrette. That is when it happened. She asked if she could use walnut oil instead of olive oil. I said why not? I suggested using white balsamic instead of balsamic vinegar. And so it is that Sweet Sister’s Vinaigrette was born. It is so so good. I actually stopped my work to post this. Shhh! Don't tell on me. I guess that is a perk of working from home. Anyway, the dressing is deliciously sweet from the white balsamic and the honey. Sister said it reminded her of sweet vidalia onion dressing. She said she wants to try replacing the garlic with onion very soon. I love it just as is. I think this is my new go to dressing for spinach salads. You just have to try this one.


White Balsamic Vinaigrette
aka Sweet Sister’s Vinaigrette
Makes approx. 1/2 cup

Ingredients

3 oz walnut oil
1 oz white balsamic vinegar
1 tsp Dijon mustard
1 garlic clove, minced (approx. 1/2 tsp)
1 tsp honey
1/8 tsp Italian seasoning
Salt, black pepper and red pepper flakes, to taste

Directions

Mix vinaigrette ingredients in a small mason jar. Secure with lid and shake until emulsified. Store remaining dressing in the refrigerator for up to a week. Great over a spinach and mushroom salad.


Linking to:
It's Your Life: Tuesdays with a Twist
Anyonita Nibbles: Tasty Tuesdays
Dizzy Busy & Hungry: Wine'd Down Wednesday
Buns In My Oven: What's Cookin' Wednesday
Miz Helen's Country Cottage: Full Plate Thursday
Turnips 2 Tangerines: Four Seasons Blog Hop
My Turn for Us: Freedom Fridays with All My Bloggy Friends
My Kitchen Escapades: Super Saturday Link Party
My Mixing Spoon: Random Recipe Roundup
Ms.enPlace: See Ya in the Gumbo
My Pinterventures: Summer Salads Party

Related Posts Plugin for WordPress, Blogger...